 |
 |
 |
|
GETTING GREAT VOCAL SOUNDS Unless you're making instrumental records, the vocal is the most important sound on your record. It stands to reason that it should be the sound you take the most care with, both in the recording and in the mixing stages. Since there is so much to consider in making the decisions you'll make about recording your vocal, I'm going to divide this into sections, each dedicated to a particular aspect of making your recordings sound great. The first thing you need to to have in order to record a great sound is a great sound to record. (Duh!) A singer with a great voice who sings with passion, feel, good intonation and proper rhythm is going to sound great no matter what microphone you put in front of them. A lousy singer isn't ever going to sound much better than a mediocre performer. Sorry. That's just the way it is. I went through a stretch at one time in my career when many of the singers I worked with weren't blessed with the greatest of voices. And I got more and more displeased with the way the vocals in my records were sounding - so much so that I kind of started beating myself up a little, thinking I just couldn't get a good vocal sound any more and wondering if my equipment was substandard. Then one day a singer with a beautiful voice came in to the studio at which I was working. He stepped up to a microphone I had used for some of the other singers and suddenly that microphone and all the rest of my gear sounded much better! Obviously, the difference was that I had a great sound to record. We as engineers don't have any control over the sonic beauty of the voice we're recording. But there are plenty of things we can control in order to assure that our recording of that voice is the best it can be.
RECORDING SPACE - The first thing you have to do is find the right place to record. For some of you with only one small recording area, this is pretty simple - record in the space you have. For those who have multiple rooms or larger rooms, you may have to do a little experimenting to see which area might work best for recording vocals. Remember that all areas of the same room don't always sound the same. By walking around in a room and talking (somewhat loudly) and listening (somewhat carefully) you can learn which parts of your room sound better. You'll probably find that there are areas in which you are much more aware of the sound of the room. In general, those are areas to avoid. I try to find the area where I'm least aware of the room. That's where I'll place the mic. Then I'll face different directions to see (hear) what the differences are. Again, I'm going to choose the direction where I'm least aware of the sound of the room. I've worked in some rooms in which I've had the singer's back against a wall, others in which the singer has been right in the middle of the room and even those in which I've had the singer face a wall or even a corner to sing. Your experimenting in your room will tell you what works best. Utilizing baffles to knock down some unwanted reflections can be very effective as well. This is especially true for those who have a very limited space. Acoustic treatments on walls and particularly in corners can drastically improve the sound of a small room and I would urge you to take steps to that end. The room in which I do most of my recording is about 12' by 20' with hardwood floor and throw rugs. (It used to be my living room.) The room feels pretty good and is wonderful for recording piano, acoustic guitar and horns, but it's a little too live for cutting vocals. Using less than $75 worth of materials, I built two baffles which I can move around in the room as necessary. Each baffle is basically a folding closet door, lined on the inside with compressed fiberglass sheathing and with a 4-inch thick foam cushion suspended from the top. When I place the baffle to one side of the microphone and quite close to it, the baffle effectively eats up much of (but not all) the room ambience and allows me to get a really good, natural sound. Remember that the sound of your room will be recorded with the vocal and thus become a part of the vocal sound. Whatever you do, take the time to assess your recording space. Is it suitable for vocals? If not, how can you fix it? I cannot overemphasize the importance of finding and/or creating the best space in which to record.
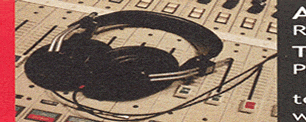
EQUIPMENT SELECTION - There are about a gazillion different hot-rodded mics and preamps available now that are designed to improve the vocal sound you're getting. Commercial studios usually have a few of these as options for an engineer to choose from. And these things can often be quite pricey. The good news for those of you who might not be able to spend $10,000.00 or more for a microphone and preamp is that prudent use of more standard (and more affordable) studio mics and preamps can still deliver outstanding results if you take some care and follow a few basic guidelines. I'm not going to come out and endorse any certain microphone or preamp because I believe that it's not WHAT you have that matters - it's HOW you use what you have. Often our tendency is to set up our best condenser microphone for a vocal and use it. And often it is the right choice. However, you MUST trust your ears. If your singer doesn't sound good on your "best" mic, your mic just might not be the best one for this singer. Once you've determined that the microphone is working properly and that the singer is positioned appropriately to the mic and you're not getting what you want, then it's time to try another mic. ("But, but... I only have a few other mics and they're not very expensive." That's okay. Nowhere on the cd cover is it going to list how much you paid for the vocal mic.) Many of you readers may not have a large selection of mics from which to choose. But you might be surprised at how well a microphone that wasn't your first choice works. The important thing is that you try different mics if you're not happy with the sound you're getting from your first choice. Another thing to consider is to rent a mic. You might not be able to afford to purchase a $3000 microphone, but perhaps you can get two or three hundred dollars added to your recording budget to rent a $3000 mic for a few days. Don't be afraid to use dynamic mics. Sometimes they end up being better suited for a particular singer's voice. I read an article years ago by noted engineer and studio owner Allan Sides (Mix Magazine, November 1983). In the article he revealed that the microphone used to record Michael Jackson's vocals on the Thriller album was a Shure SM-7. It was a little surprising to me that with all the wonderful and esoteric mics available, a relatively inexpensive ($300) mic was chosen. It was not surprising that Bruce Swedien, the engineer on this album and one of the most respected engineers in the world, made this choice with his ears and certainly not by looking at prices in a catalog. Sides goes on to say in his article that a singer with a soft voice (let's face it, Michael's no screamer) needs "dynamic urgency". This is Allan's term and I think it's so appropriate. Sometimes you put a singer in front of what you think to be the best condenser mic you have but once you hear it in the track, you find that the sound just doesn't work well with the instruments. Simply put, you can't hear the vocal very well; there's no "drive" to the vocal sound. It just doesn't "cut" through the band. Many dynamic mics have a little "edge" to them that condensers don't have. It's like a midrange bump without sounding too harsh. Interestingly, adding midrange eq to a condenser mic doesn't seem to duplicate this sound. This "dynamic urgency" is just a characteristic of many dynamic mics and one which can really help some singers' voices be better heard in a track. So don't shy away from dynamic mics. You'd be surprised to know how many vocals on your favorite records were cut with a dynamic mic.
SESSION SET-UP - Setting up for the vocal is also important. No matter how experienced your singer is, you should never just set up the mic and send the singer out to it. While you should already have the microphone in place, you should accompany your singer to the mic and check to make sure the mic is at the correct height, that the singer stands close enough to the mic (REALLY REALLY IMPORTANT) and that the singer can easily reach headphones and headphone box. A music stand should be in place if the singer needs to refer to a lyric. Be careful to position the stand so that the singer is still singing into the microphone. This is very important. If a singer is reading all the words, he is gradually going to point his face more in the direction of the music stand. If that's the case then you need to move the microphone so that it's between the stand and the face. It can sometimes be a challenge to position everything in such a way that the singer can see the lyric and still be singing into the microphone. Pop screens throw another wrench into the works. It took me several years but I finally noticed that most pop screens are WAY BIGGER than they need to be. And that extra size serves to effectively block the singer's view of the music or lyrics. I've found that when using large pop screens, I can set them up off center so that they don't protrude at all on one side of the mic. Then I place the stand at eye height behind the microphone and place it to the side of the mic that has the unobstructed view. Warning: If you can't get the music stand up to eye level, then you'd better set the mic lower because your singer is going to look down to see his words and end up singing under the microphone. But take the time to get it right. If you don't you'll wish you did. How close to the mic should your singer be? While there's no rule here, you want to make sure the singer is close enough that you hear plenty of presence in the voice. Generally speaking, you want the mic to receive significantly more direct sound from the singer than reflected sound or room sound. If you're going after a very intimate vocal, your singer is going to have to be quite close - two inches or less. However, a good place to start is about four inches away. You can make adjustments from there.
In the next installment we'll look at getting levels and headphone mixes.
As always, I appreciate your comments and invite you to continue sending them in. Just go to the "Contact Us" page of this site and write them in where it says "comments". And if you have questions you think I can answer I'll be glad to give them a go.
|